Friday, July 29, 2011

Seriously?!?

Have you ever grown zucchini? 

Have you ever gone away for a week during zucchini season? 

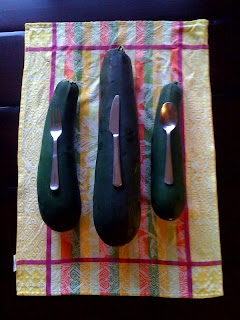
If so, you might have returned to something like this:

Zucchini, tea towel and utensils for scale

Seriously?!?

These zucchini are complete and utter monsters, weighing in at a whopping 2.2, 3.1, and 5.9 lbs! 

Zucchini, human for scale

Look- this one is even bigger than my torso!  And I'm 5'7".  Honestly, these things are ridiculous.

So what on earth is a gardener to do with such things?  One easy answer is: compost!  Another is: feed 'em to the hogs!  It's still early in the season and I'm not sick of zukes yet so I won't compost them, and we don't have any hogs (unless you count Snoutface and the vaguely-domesticated-semi-feral-jungle-housecats, who could probably eat more than hogs).  I need to come up with some ideas on what to do with totally overgrown, probably not-so-sweet, and probably tough zucchini.

It is clear that these badboys would be no good for a zucchini carpaccio or other delicate preparation that calls for nice baby squash.  These seem to call for cooking in a (futile?) attempt to change their texture.  I am thinking a lifetime supply of zucchini bread (I could probably try ever recipe I've ever read) and a batch of zuke soup.  Worst-case scenario I can remove the seeds, grate them, and then freeze enough shredded zucchini to see me well into next summer.

Do you have any ideas what to do with these monsters?  If so, please help me out and leave a note in the comments!

Tuesday, July 26, 2011

Garlic Scapes: A Gardener's Delight

Freshly harvested garlic scapes
Garlic scapes are one of those rare treats that most people can only get by growing garlic.  Sometimes they will crop up at the farmer's market, but most folks wouldn't recognize them if they did.  I had never seen them in person until this year when I grew my own garlic. 

Garlic scapes are flower heads that hardneck varieties of garlic send up in mid-summer.  Softneck varieties of garlic (most of the ones in the grocery store) do not form scapes.  As a gardener, you want to cut the scapes off so that the garlic can focus its energy on creating a bigger bulb.  But don't let these garden delicacies go in the compost bin!  They are absolutely delicious.

Since this was my first season growing garlic, I wasn't sure how to cook the garlic scapes.  I went over to DigginFood, one of my all-time favorite gardening/cooking blogs, and used Willi's recipe for garlic scape pestoOhMyGod.  It was truly better than any pesto I have ever had, EVER!  If you can get your hands on some garlic scapes I can not recommend this recipe more highly.  Did I mention it takes about 5 minutes to make?  Yeah, it's awesome.

The pesto has just a few ingredients including the scapes, walnuts, Parmesan Reggiano, and basil.  Throw in some olive oil and a dash of salt, whirl it in the blender and there you have it.  The thing that makes it so truly amazing are the scapes.  They manage to taste sweet, garlicky, and grassy all at the same time.  I hope that you can find some scapes to try out this recipe, and if not, just plant some hardneck garlic next fall- it really is a cinch to grow!  After learning what I've been missing, I think I'll double next years garlic crop.

Friday, July 22, 2011

Garlic Harvesting and Curing


First come yummy garlic scapes, then you get full-on heads of garlic!  Aside from the fact that Bermuda grass, my nemesis, tried to infiltrate my garlic bed, this was a seriously easy plant to grow.  I'm sure I'll do better next time, too.  If I had watered a bit more at the start of the summer I probably could have grown larger heads, but who cares.  I can't wait to taste it!  Garlic is hugely popular in this household and I have no doubt we'll be able to work our way through the entire harvest.

Since this was my rookie garlic gardening season, I consulted the interwebs and my library heavily for information related to the best methods to employ.  The best, most thorough and concise info I could find came from Margaret Roach over on A Way to Garden.  She has several posts on when to harvest, how to cure, and methods of preservation.  This post on curing was most applicable for me and I was so grateful to find it!

Following Margaret's instructions, I gently dug the garlic heads up with my gloved hands, being careful to keep the stems attached (to preserve the storage life of the bulb).  I lightly brushed off the dirt and then tried to figure out what on earth to do with all of it!  The idea is to lay (or hang) the garlic out to dry for several weeks in a shady, well-ventilated spot.  If I had a spare screen door kicking around, it would have been perfect.  I dug around in the garage for a while, got frustrated, then wandered around outside to see if anything struck a chord.  Then I found my solution.

Our front porch was once held up by old metal scroll work panels (circa 1963).  I'm sure they were quite dashing back in the day, but they looked rather dated now.  We replaced them with 4"x4" posts, but I didn't want to get rid of them.  They seemed like a great raw material to build some sort of garden trellis out of.  Note that those grand plans have resulted in four metal scroll work panels being stacked along the side of the house for the last five months.  Oops.


Well, it just so happened that I could balance one of those scroll work panels over a pair of sawhorses and end up with a perfectly adequate garlic drying rack!  Ta da!  In order to keep it nice and shady, I set the rack up under the eaves on the north side of the house, and then put up a large outdoor umbrella for good measure.  I hope this works because I am looking forward to lots of garlic-eating all year long!

Tuesday, July 19, 2011

Home Cured Salami Class!

Have you ever made your own salami?  I suspect the answer is "No" for most of you, perhaps with a "you nutball" muttered under your breath at the end.  Well, after last week, I have!  And you know what?  It is so much fun it's ridiculous.  Seriously.

I took the Home Cured Salami Making class recently offered by the Institute of Urban Homesteading and it was a huge success.  Nine enthusiastic students, ranging from a seasoned sausage maker to a recovering vegan, showed up to be taught by the master.  We started with a classroom session covering the basics along with a sample of our teacher's home-cured salami: delicious!  (I conveniently parked myself on the couch next to the snacks). 

After the basics we all piled into the kitchen, broke into teams of two, and got to select our own seasonings.  That was when things really started getting fun.  My partner and I selected a mix of ground dried fennel, coriander and pepper, along with a generous helping of Aleppo pepper, garlic and a dash of red wine.  Yum!  We mixed all the seasonings into our bowl of ground pork and fat until it looked well-mixed and we were happy with the smell (we wanted to know all the seasonings were there- we ended up doubling the amount we started with).  At this point, our instructor poured each of us a wee dram of home-distilled plum brandy.  Woohoo!

Next, we all took turns at the "sausage stuffer," filling casings with our mixtures.  It's impossible to avoid making inappropriate jokes at this stage, even if you had refrained earlier.  You are literally putting a condom of casing over a tube and then cranking out salami.  One simply cannot retain one's decorum (though it might have been easier to behave before the brandy...).  Once you've filled your casing with meat, you twist it into links and then hang it up to cure.  That's it!  Though can I just say- cranking several pounds of meat through the sausage stuffer was a serious workout!  My triceps are still sore and the bruise on my palm is gonna be there for a little while yet.  Totally worth it, but don't underestimate the physical effort that's involved.


A team readies their salami for casing. 


Their first salami is already done and ready to be hung up.

Half-way through - 
one long link of salami, soon to be twisted, tied, and hung.

The teacher has a nice little room off the basement where the salami are now hanging up to cure.  It will take about three weeks and then I'll have my very own home-cured salami to enjoy.  I should get my act together and make some cheese and brew some beer... I think this will definitely call for a party!  I'll be sure to let you know how it turns out, and let you know if I take the next step and try this again on my own.  If nothing else, this class reaffirmed my appreciation for the wonderful world of charcuterie.

Curing salami... Yum!

Friday, July 15, 2011

Garden Bloggers' Bloom Day July 2011

Wow!  July is quite the season for blooms in the garden right now.  In addition to all the yummy veggies flowering away, there are lots of lovely blooms out in the front yard- home of drought tolerant and/or California native plants.  Enjoy!

California fuschia

California fuschia

Pink buckwheat

White sage

Chitalpa

Desert willow

Tuesday, July 12, 2011

Pickin' Through the Fridge

Learning to garden and cook has been a real process for me.  As a scientist, I expect that there are Best Ways To Do Things that someone before me has already figured out (science couldn't happen if we didn't rely on each other- "standing on the shoulders of giants" and all that).  The result is that I scour the internet and have amassed quite a decent library of gardening guides and cookbooks. 

Only now, though, do I feel confident enough to break out on my own.  I have spent enough time tending the garden to have a fair idea what to expect.  Perhaps more importantly, I'm no longer terrified of not knowing that one little thing that will send the whole garden into a spiral of disaster.  Chances are, that one little thing doesn't exist, and if it does, no amount of reading or studying or worrying is going to prepare me for it.

The same goes in the kitchen.  My husband will be the first to tell you that I used to never veer from a published recipe.  If it called for 1/8 teaspoon of cumin, you bet your @ss I was measuring out the 1/8 tsp precisely.  The same went for things like salt and pepper measurements.  My husband thought I was nuts.  I have three explanations for this behavior:

1. I was once a geochemist (for 2.5 years) and chemists do not adjust their measurements willy-nilly.  Ever.

2. I learned to bake before I learned to cook.  An eighth tsp of cornstarch means an eighth tsp of cornstarch.

3. I had no experience and therefore no confidence in branching out on my own.  Why mess up a perfectly good meal by not following the recipe.  Do I know better than these masters of culinary artistry who wrote this recipe?  I think not.

Well, I am happy to report that I now have enough experience and confidence to throw things around in the kitchen.  I can't imagine measuring salt or pepper (or most spices for that matter).  I read recipes and then forget half the details but try to pull it together anyway.  I still use recipes, all the time.  It's just in a very different style than before.  I use recipes as guidelines or inspiration, not rigid rules which must be followed to the decimal point.

All this back story at last brings me around to the point of today's post (that took a while).  I made a delicious meal last week (repeated this weekend) through no more planning than determining what was ripe in the garden and what was kicking around in the fridge.  For many people, that's normal.  For me, it represents a personal breakthrough from my dependence on recipes.  I can now cook for and by myself.  Yippee!

In the garden I had four little zucchinis just ready to be picked.  Alone, they weren't really enough for a meal.  I went inside and starting picking through the fridge to see what I could combine them with.  I found some flatbread (left over from chicken souvlaki), some basil (left over from pesto), and some Saint Andre cheese (heaven in cheese form- it's similar to Brie but a million times more delicious).  This would form the basis of my dinner.  I served it alongside some leftover pesto pasta and was so happy when I finished dinner I didn't want to drink any water for fear of washing away the lovely flavors.


Zucchini Basil Flatbread
serves 1, easily up-scaled or served as an appetizer

4 baby zucchini or 1 medium zucchini, diced (~1 cup)
Olive oil
Red pepper flakes
Salt and pepper
1 round flatbread (I use Trader Joe's; pita would work well, too)
1 bunch basil
~half a wedge St. Andre cheese (if using Brie, may need less)

1. Put a splash of olive oil in a small pan over medium heat.  Add red pepper flakes to the oil.  When the oil is hot, add diced zucchini.  Cover and saute, about 5-10 minutes.  When zucchini are cooked through, remove lid and add salt and pepper.  Continue to saute, about 5 minutes, until some zucchini are brown in spots.  Remove from heat.

2.  Toast flatbread.  Slice cheese thinly and layer over toasted flatbread (the heat from the bread will melt the cheese slightly).  Cover cheese with a layer of basil leaves.  Top basil with sauteed zucchini.  Add a dash of kosher salt.  Enjoy!

p.s. the orange in the photo above is the zucchini blossom- I sliced it up and tossed it in at the end of the zucchini sauteing cause, why not?
Friday, July 8, 2011

Mighty Kitchen Garden Update

The garden continues its slow movement into proper summer production.  I am finally harvesting little baby zucchini and a strawberry or two seems to ripen every couple of days.  Before I know it I'll be inundated in squash and drowning in tomatoes.  It doesn't quite feel that way yet, but I know it's coming.  In the quiet before the storm, I thought it would be a good time to show you what's doing what here at the MKG.


The squash and zucchini are looking like the garden monsters they are.  There are lots of blossoms and some baby zukes starting to come in.  In about a week I will have to start on the Daily Zucchini Patrol, lest I miss one and it grows into a vegetable club.  Seriously, you could knock someone out with an overgrown zucchini.  I'm sure I'll have one to show you later in the season.  Also, it's prime time to whip up some stuffed squash blossoms.  Yum!


The eggplants are all sporting their pretty little lavender flowers, but no baby fruits yet.  I think I might need to add some flowers to the garden to attract more bees, they seem less abundant than in years past.


This is a baby Giant Aconcagua pepper.  It's hard to see - look in the center of the picture to the left of the main stem.  There it is!  It should be ready to harvest in about a week.  The only other pepper with fruit so far is the Hungarian yellow wax.  Let's hope the others get their groove on soon.


The strawberries are chugging along one fruit at a time.  I had two for dessert last night and one for a snack this morning.  There's no point in trying to save them up, better to just give them a quick rinse and pop them in my mouth.


Little baby Sungolds!  The all-time tomato favorite in our household.  In fact, I've yet to meet a person familiar with Sungolds who wasn't a huge fan.  This is a stupendously delicious tomato.  Still looking at another week or more until I can eat one- the suspense is killing me!


I won't have to wait long once the tomatoes start coming in though- there are lots of flowers ready to turn into tomatoes.


Last but not least, we have the corn (back) and beans (front).  The corn isn't exactly "knee high by the 4th of July" but I planted them late and they are a dwarf variety that only grows to 3 feet or so anyway.  It's my first year for corn so I'm not holding my breath.  The beans seem to be coming in nicely.  A few more weeks and I will be able to harvest them. 

Come to think of it - I had a dream last night (seriously) that I was picking a purple bean off a plant and realized it had green beans growing below it on the same plant.  And the beans next to it were Borlotti beans.  Hmmm, apparently my subconscious is ready to get this harvest started!

How does your garden grow?

Tuesday, July 5, 2011

Nap Time

I was puttering around in the garden recently when a rather unexpected thing happened: T-bone climbed up to investigate my half-empty bag of compost.  I figured, what does a cat want with compost so let him sniff.  And then, he proceeds to squeeze his little kitty self into the bag and curl up as if this is the perfect place for a nap.  Seriously?  A stinky bag of compost? 


Apparently, yes.

Friday, July 1, 2011

June 2011 MKG Harvest

Every Zinyard needs an artichoke finial
Wow.  I am way behind on my harvests relative to the last few years.  I mean, it's already July and I haven't harvested any zucchini yet!  There are two reasons- cold weather and slow planting.  Oops.  Oh well, it's been a busy spring.

The June 2011 MKG Harvest:

  - 2 bunches chard
  - 2 bunches lettuce
  - 3 artichokes
  - 2 lemons
  - 1 strawberry
  - 1 Hungarian yellow wax pepper
  - ~20 garlic scapes
  - thyme

With the exception of the strawberry, pepper and scapes, that looks like a list more appropriate to March.  Seriously, 2011 has been a very strange gardening year thus far.

What did I do with this sparse harvest, you ask?  Well, some of it I gave away, some was nibbled on, some is in the fridge awaiting the weekend (garlic scapes) and the rest became:

- Lettuce and Pear and Blue Cheese and Walnut Salad
- Potstickers with garlicky greens (chard)
- Artichokes with lemon-thyme aioli
- Sauteed chard with garlic and lemon juice
- Chicken souvlaki with Hungarian wax pepper
- Black bean and corn quesadillas with Hungarian wax pepper

That makes me feel better.  The harvest might have been small, but more importantly, it was delicious.
Related Posts Plugin for WordPress, Blogger...